안녕하세요.
자바스크립트 스프링으로 애플로 로그인 대망의 마지막 3편 입니다.
사용자들마다 개발 환경이 다르기 때문에 따라하기에 많은 어려움이 있을것으로 예상됩니다.
저또한 애플로 로그인을 구현하기 위해
jwt에 대한 개념, rest api에 대한 개념, http통신에 대한 개념을 다시한번 찾아보며
구현을 했기 때문에 많은 어려움이 있었습니다.
이해가 안되는 부분이 있으시면 각 개념에 대한 공부를 하시고 다시 참고하며 도움이 될 것입니다 .
그리고 아마 import가 안되는 클래스들이 많을텐데 maven repository에서 모듈을 추가해서 사용하시기 바랍니다.
참고로 저는
<!-- https://mvnrepository.com/artifact/com.nimbusds/nimbus-jose-jwt -->
<dependency>
    <groupId>com.nimbusds</groupId>
    <artifactId>nimbus-jose-jwt</artifactId>
    <version>8.4</version>
</dependency>
<!-- https://mvnrepository.com/artifact/io.jsonwebtoken/jjwt -->
<dependency>
    <groupId>io.jsonwebtoken</groupId>
    <artifactId>jjwt</artifactId>
    <version>0.9.1</version>
</dependency>
<!-- https://mvnrepository.com/artifact/org.bouncycastle/bcprov-jdk16 -->
<dependency>
    <groupId>org.bouncycastle</groupId>
    <artifactId>bcpkix-jdk15on</artifactId>
    <version>1.50</version>
</dependency>
위의 의존모듈을 추가했습니다.
다른 모듈이 더 필요한 분들도 있을 것입니다.
자 이제 구현을 시작하겠습니다.
@RequestMapping(value="loginCallBackApple")
	public String appleLoginCallBack(@RequestBody String apple_data, HttpServletRequest request, Model model){
    	logger.warn(apple_data);
        //또는 System.out.println(apple_data);
    	return "apple/callback.jsp";
    }
callBackUrl 설정을 하셨을테니 애플로 로그인을 하면 콜백url페이지로 이동이 될 것입니다.
이때 애플이 콜백url에 필요한 정보를 보내줍니다.
위의 코드에서 @RequestBody String apple_data 에 해당하는 부분을 통해 필요한 정보를 받을 수 있습니다.
로그를 찍거나 콘솔창에서 내용이 어떻게 되는지 확인해보세요.
아마 code=[값]&id_token=[값]&state=[값] 이런식의 값을 받을 수 있을 것입니다.
여기서 code는 authorization code이고 id_token값은 애플에서 보낸 jwt입니다.
state값은 스크립트에서 애플로로그인을 불러올때 설정한 state값이 그대로 출력 될 것입니다.
애플은 이 id_token에 대해 다음 5가지 사항을 증명하라고 요구합니다.
- Verify the JWS E256 signature using the server’s public key
- Verify the nonce for the authentication
- Verify that the iss field contains https://appleid.apple.com
- Verify that the aud field is the developer’s client_id
- Verify that the time is earlier than the exp value of the token
출처
developer.apple.com/documentation/sign_in_with_apple/sign_in_with_apple_rest_api/verifying_a_user
Apple Developer Documentation
developer.apple.com
첫번째 내용은 JWS ES256 signature 을 공개키로 증명하라는 것입니다.
es256 알고리즘으로 암호화되어있는 jwt의 signature(서명)을 증명하라는 뜻이라고 이해하면 됩니다.
여기서 jwt의 개념이 필요합니다.
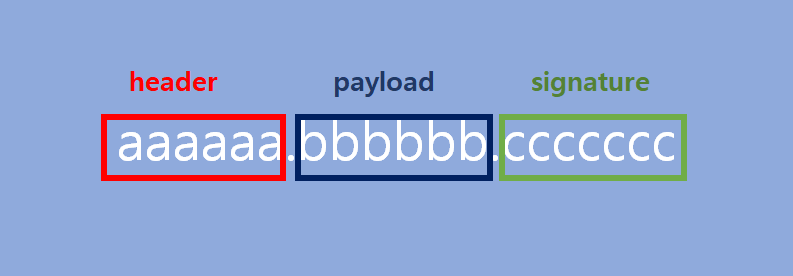
jwt은 우선 아래와 같이 header와 payload, signature로 구성되어있습니다.
header에는 kid(key ID), alg(알고리즘 유형)으로 구성되어있고 payload는 전달하고자 하는 정보들이 담겨있습니다.
signature는 header와 payload를 비밀키와 header에 있는 알고리즘 유형으로 암호화한 정보입니다.
header 정보와 payload 정보를 출력해보면
{"kid":"[key ID]","alg":"RS256"}
{"iss":"appleid.apple.com",
"aud":"[앱ID 또는 서비스ID]",
"exp":토큰만료시간,
"iat":토큰생성시간,
"sub":"[토큰 주제]",
"nonce":"자바스크립트에서 설정한 nonce값",
"c_hash":"[값]",
"email":"[이메일]",
"email_verified":"true",
"is_private_email":"true",
"auth_time":[값],
"nonce_supported":true}
위와 같이 출력이 될것입니다.
직접 코드 내용을 출력해보시고 싶으시면 아래 코드를 이용하면 출력할 수 있습니다.
 	    String[] jwt = id_token.split("[.]");
	    Decoder decoder = Base64.getDecoder();
	    for(String info : jwt) {
	    	byte[] decodedBytes = decoder.decode(info);
	 	    System.out.println("인코딩 전 : " + new String(decodedBytes));
	    }
다만 signature가 암호화 되어있어 마지막 signature는 출력이 안되고 오류가 날 것입니다.
header와 payload값은 정상적으로 출력될 것입니다.
위의 코드는 실제 사용하지는 않고 단순히 header와 payload가 어떻게 구성되어있는지 확인하는 용도입니다.
자 잠깐 jwt의 개념과 애플이 보낸 id_token값이 어떻게 이루어졌는지 살펴보았는데요.
이제 signature를 증명하겠습니다.
jwt의 sinature를 증명하라는 것은
공개키를 통해 signature 값을 복호화 하여 header값과 payload 값과 같은지 비교하라는 것입니다.
그렇다면 공개키를 받아와야겠죠.
		String[] datas = apple_data.split("[&]");
		String code = "";
		String id_token = "";
		for(String data : datas ) {
			if(data.equals("code=")) {
				code = data.replace("code=", "");
			}
			if(data.equals("id_token=")) {
				id_token = data.replace("id_token=", "");
			}
		}

	    logger.warn(code);
	    logger.warn(id_token);
		SignedJWT signedJWT = SignedJWT.parse(id_token);
		JWTClaimsSet payload = signedJWT.getJWTClaimsSet();

		String publicKeys = HttpClientUtils.doGet("https://appleid.apple.com/auth/keys");
        ObjectMapper objectMapper = new ObjectMapper();
        Keys keys = objectMapper.readValue(publicKeys, Keys.class);

        boolean signature=false;
        for (Key key : keys.getKeys()) {
        	 RSAKey rsaKey = (RSAKey) JWK.parse(objectMapper.writeValueAsString(key));
             RSAPublicKey publicKey = rsaKey.toRSAPublicKey();
             JWSVerifier verifier = new RSASSAVerifier(publicKey);
             if (signedJWT.verify(verifier)) {
            	 signature=true;
            	 logger.warn("복호화 성공");
             }
        }
위의 코드가 공개키를 가져와서 복호화까지 하고 signature를 증명하는 코드입니다.
String publicKeys = HttpClientUtils.doGet("https://appleid.apple.com/auth/keys");코드내용중 위의 코드가 애플의 공개키를 가져오는 코드입니다.
그리고 for문 안의 부분이 공개키를 통해 header, payload와 값이 같은지 비교하는 과정입니다.
애플이 공개키를 3개 보내주기 때문에 3개중에 내가 받은 정보와 같은 알고리즘 유형으로 하나만 성공하면 됩니다.
위에서 키값을 받아오는데 사용된 Key.class와 Keys.class 코드입니다.
public class Key {

    private String kty;
    private String kid;
    private String use;
    private String alg;
    private String n;
    private String e;

    public String getKty() {
        return kty;
    }

    public void setKty(String kty) {
        this.kty = kty;
    }

    public String getKid() {
        return kid;
    }

    public void setKid(String kid) {
        this.kid = kid;
    }

    public String getUse() {
        return use;
    }

    public void setUse(String use) {
        this.use = use;
    }

    public String getAlg() {
        return alg;
    }

    public void setAlg(String alg) {
        this.alg = alg;
    }

    public String getN() {
        return n;
    }

    public void setN(String n) {
        this.n = n;
    }

    public String getE() {
        return e;
    }

    public void setE(String e) {
        this.e = e;
    }

}
import java.util.List;

public class Keys {

    private List<Key> keys;

    public List<Key> getKeys() {
        return keys;
    }

    public void setKeys(List<Key> keys) {
        this.keys = keys;
    }

}
http통신을 위한 코드입니다.
package http.communication;

import com.fasterxml.jackson.core.JsonProcessingException;
import com.fasterxml.jackson.databind.ObjectMapper;
import org.apache.http.HttpEntity;
import org.apache.http.NameValuePair;
import org.apache.http.client.entity.UrlEncodedFormEntity;
import org.apache.http.client.methods.CloseableHttpResponse;
import org.apache.http.client.methods.HttpGet;
import org.apache.http.client.methods.HttpPost;
import org.apache.http.impl.client.CloseableHttpClient;
import org.apache.http.impl.client.HttpClients;
import org.apache.http.message.BasicNameValuePair;
import org.apache.http.util.EntityUtils;
import org.slf4j.Logger;
import org.slf4j.LoggerFactory;

import java.io.IOException;
import java.util.ArrayList;
import java.util.List;
import java.util.Map;
import java.util.Map.Entry;
import java.util.Set;

public class HttpClientUtils {

    private static Logger logger = LoggerFactory.getLogger(HttpClientUtils.class);
    private static ObjectMapper objectMapper = new ObjectMapper();

    public static String doGet(String url) {
        String result = null;
        CloseableHttpClient httpclient = null;
        CloseableHttpResponse response = null;
        Integer statusCode = null;
        String reasonPhrase = null;

        try {
            httpclient = HttpClients.createDefault();
            HttpGet get = new HttpGet(url);
            response = httpclient.execute(get);
            statusCode = response.getStatusLine().getStatusCode();
            reasonPhrase = response.getStatusLine().getReasonPhrase();
            HttpEntity entity = response.getEntity();
            result = EntityUtils.toString(entity, "UTF-8");
            EntityUtils.consume(entity);

            if (statusCode != 200) {
                logger.error(String.format("[doGet]http get url(%s) failed. status code:%s. reason:%s. result:%s", url, statusCode, reasonPhrase, result));
            }
        } catch (Throwable t) {
            logger.error(String.format("[doGet]http get url(%s) failed. status code:%s. reason:%s.", url, statusCode, reasonPhrase), t);
        } finally {
            try {
                if (response != null) {
                    response.close();
                }
                if (httpclient != null) {
                    httpclient.close();
                }
            } catch (IOException e) {
                logger.error(String.format("[doGet]release http get resource failed. url(%s). reason:%s.", url, e.getMessage()));
            }
        }

        return result;
    }

    public static String doPost(String url, Map<String, String> param) {
        String result = null;
        CloseableHttpClient httpclient = null;
        CloseableHttpResponse response = null;
        Integer statusCode = null;
        String reasonPhrase = null;
        try {
            httpclient = HttpClients.createDefault();
            HttpPost httpPost = new HttpPost(url);
            httpPost.addHeader("Content-Type", "application/x-www-form-urlencoded");
            List<NameValuePair> nvps = new ArrayList<>();
            Set<Entry<String, String>> entrySet = param.entrySet();
            for (Entry<String, String> entry : entrySet) {
                String fieldName = entry.getKey();
                String fieldValue = entry.getValue();
                nvps.add(new BasicNameValuePair(fieldName, fieldValue));
            }
            UrlEncodedFormEntity formEntity = new UrlEncodedFormEntity(nvps);
            httpPost.setEntity(formEntity);
            response = httpclient.execute(httpPost);
            statusCode = response.getStatusLine().getStatusCode();
            reasonPhrase = response.getStatusLine().getReasonPhrase();
            HttpEntity entity = response.getEntity();
            result = EntityUtils.toString(entity, "UTF-8");

            if (statusCode != 200) {
                logger.error(String.format("[doPost]post url(%s) failed. status code:%s. reason:%s. param:%s. result:%s", url, statusCode, reasonPhrase, objectMapper.writeValueAsString(param), result));
            }
            EntityUtils.consume(entity);
        } catch (Throwable t) {
            try {
                logger.error(String.format("[doPost]post url(%s) failed. status code:%s. reason:%s. param:%s.", url, statusCode, reasonPhrase, objectMapper.writeValueAsString(param)), t);
            } catch (JsonProcessingException e) {
            }
        } finally {
            try {
                if (response != null) {
                    response.close();
                }
                if (httpclient != null) {
                    httpclient.close();
                }
            } catch (IOException e) {
                try {
                    logger.error(String.format("[doPost]release http post resource failed. url(%s). reason:%s, param:%s.", url, e.getMessage(), objectMapper.writeValueAsString(param)));
                } catch (JsonProcessingException ex) {
                }
            }
        }
        return result;
    }

}
자 이제 드디어
- Verify the JWS E256 signature using the server’s public key
하나 끝냈습니다.
이제 나머지 네개를 증명하겠습니다 .
 	Date currentTime = new Date(System.currentTimeMillis());

        String aud = payload.getAudience().get(0);
        String iss = payload.getIssuer();
        String nonce =(String)payload.getClaim("nonce");

        if (!currentTime.before(payload.getExpirationTime()) || !aud.equals("[identifier]") ||!iss.equals("https://appleid.apple.com")|| !nonce.equals("[nonce값]")) {
        	//실패 처리
        }
끝입니다.
nonce가 내가 설정한 값과 같은지, 만료시간이 지나지 않았는지, iss가 https://appleid.apple.com와 같은지
그리고 aud는 앱ID 또는 서비스ID를 나타냅니다. apple Developer에서 설정한 identifier값 있죠.
1편에서 설명한 도메인이 naver.com이고 앱이름이 myApp이면 com.naver.myApp으로 설정했던 identifier값 입니다.
그 값이 같은지 증명하면 됩니다.
자 여기서, 추가구현이 필요한 사람이 있을것이고 여기서 끝이 나는 사람이 있을 것입니다.
자체적으로 로그인 세션이나 쿠키를 관리한다면 여기서 더 구현할 필요가 없습니다.
왜냐면 어차피 우리는 필요한 정보인 이메일값만 가져오고 나머지는 웹서버에서 자체적으로 처리를 할 것이니깐요.
하지만 애플에서 제공하는 토큰으로 로그인 처리를 구현할 것이라면 위의 id_token은 사용하지 못합니다.
그렇기 때문에 사용할 수 있는 토큰을 발급해야합니다.
이제 다시 애플서버 측에서 사용 가능한 토큰을 발급받아 사용해야합니다.
developer.apple.com/documentation/sign_in_with_apple/generate_and_validate_tokens
Apple Developer Documentation
developer.apple.com
애플 공식 문서를 보면 어떻게 토큰을 발급받아야하는지 형식이 나와있다.
POST https://appleid.apple.com/auth/token
위의 url로 post 방식으로 요청을 해야한다.
필요한 값들은
client_id : 앱 아이디 또는 서비스 아이디
code : 우리는 제일 처음 @RequestBody를 통해 code=[값]&id_token=[값]&state=[값] 이 값을 받았습니다.
이 값의 code 값입니다.
grant_type : authorization_code 라고 적어주면 됩니다.
redirect_uri : 본인의 redirect_uri
client_secret : 이 값은 아래와 같이 구성해야합니다.
{
    "alg": "ES256",
    "kid": "[key ID]"
}
{
    "iss": "[팀 ID]",
    "iat": "[토큰생성시간]",
    "exp": "[토큰만료시간]",
    "aud": "https://appleid.apple.com",
    "sub": "[앱아이디 또는 서비스아이디]"
}
어떻게 구성되는지 이해됬다면 코드를 통해서도 이해할 수 있을 것입니다.
 ClassPathResource resource = new ClassPathResource("[apple developer에서 생성한 키파일].p8");
        String privateKey = new String(Files.readAllBytes(Paths.get(resource.getURI())));
        Reader pemReader = new StringReader(privateKey);
        PEMParser pemParser = new PEMParser(pemReader);
        JcaPEMKeyConverter converter = new JcaPEMKeyConverter();
        PrivateKeyInfo object = (PrivateKeyInfo) pemParser.readObject();


        Date expirationDate = Date.from(LocalDateTime.now().plusDays(30).atZone(ZoneId.systemDefault()).toInstant());
        String clientSecret = Jwts.builder()
                   .setHeaderParam("kid", "[key ID]")
                   .setHeaderParam("alg", "ES256")
                   .setIssuer("[팀 ID]")
                   .setIssuedAt(new Date(System.currentTimeMillis()))
                   .setExpiration(expirationDate)
                   .setAudience("https://appleid.apple.com")
                   .setSubject("[앱ID 또는 서비스ID]")
                   .signWith(SignatureAlgorithm.ES256, converter.getPrivateKey(object))
                   .compact();


        Map<String, String> tokenRequest = new HashMap<>();

        tokenRequest.put("client_id", "[앱ID 또는 서비스ID]");
        tokenRequest.put("client_secret", clientSecret);
        tokenRequest.put("code", code);
        tokenRequest.put("grant_type", "authorization_code");
        tokenRequest.put("redirect_uri", "[콜백 URI]");

        String response = HttpClientUtils.doPost("https://appleid.apple.com/auth/token", tokenRequest);
자 이렇게 응답 받든 response값을 디코드 해보면
access_token, id_token, refresh_token을 얻을 수 있을 것입니다.
refresh token을 얻었다면 로그인 또는 인증이 필요할 때마다 refresh token을 통해
access token을 재발급 받아보는 형식으로 refresh token이 유효한지 검증해주면 됩니다.
참고로 refresh token은 유효기간이 없습니다.
참고 출처 :
Spring API서버에서 Apple 인증(로그인 , 회원가입) 처리하기
들어가며 사이드 앱 서비스 프로젝트에 참여하던 도중 Apple 로그인을 적용해야 했다. 앱에서 Apple 로그인 성공 이후 백단에선 처리되는 내용을 포스팅하고자 한다. 필요성 의문을 하나 가질 수
hwannny.tistory.com
developer.apple.com/documentation/sign_in_with_apple/sign_in_with_apple_rest_api/verifying_a_user
Apple Developer Documentation
developer.apple.com
[2] 스프링 프로젝트에 애플 로그인 API 연동하기
[1] 스프링 프로젝트에 애플 로그인 API 연동을 위한 Apple Developer 설정 [2] 스프링 프로젝트에 애플 로그인 API 연동하기 - (현재 글) 이전 포스트에서 "Sign in wtih Apple" 연동을 위한 Apple Developer 3가..
whitepaek.tistory.com
공개키, 대칭키, 전자서명
비밀키 : 이 키에 따라 암호화된 결과가 달라지기 때문에 키를 모르면 복호화를 못함 대칭 키 : 동일한 키로 암호화, 복화를 같이 할 수 있는 방식 암호를 주고 받는 사람들 사이에서 대칭키 전달
vitalholic.tistory.com
'기타 > 모바일' 카테고리의 다른 글
| [안드로이드스튜디오] 플레이콘솔에 재배포, 재출시 하기(버전 업데이트) (0) | 2021.06.09 |
|---|---|
| [xcode] 앱스토어 재출시 하는 방법(재배포, 버전 업그레이드) (0) | 2021.06.04 |
| 애플로 로그인 (자바스크립트, 스프링) 완벽파헤치기[2] (1) | 2021.04.28 |
| 애플로 로그인 (자바스크립트, 스프링) 완벽파헤치기[1] (0) | 2021.04.26 |
| [iOS] 푸시알림 APN 링크 받아서 링크주소로 웹뷰 이동하기 (13) | 2021.03.03 |


