
티스토리 뷰
안녕하세요.
오늘은 스프링프레임워크&부트 redis 연동(로컬에서 실서버까지) 2편입니다.
지난번 포스팅에서 스프링부트를 통해 간단히 redis도 사용해보고 세션정보가 redis 서버로 전달됨을 확인했는데요.
이번 포스팅에서는 좀더 제대로 구현하고 테스트 하기 위해
스프링 시큐리티를 통해 로그인 인증 권한 관리가 되고 있는 프로젝트에서
세션정보 전달 뿐만 아니라 세션 관리까지 되는지 확인해보겠습니다.
로컬 환경
- 윈도우 OS
- 스프링 프레임워크 4.3.2
- 스프링 시큐리티 4.1.3
- Redis-x64-3.2.100
- mysql 5.5.2
- 빌드 툴 이클립스
레디스 설치 및 사용법은 이전 포스팅을 참조해주세요.
https://developer111.tistory.com/72
스프링부트 레디스 연동하기(레디스 서버에 세션 정보 보내기)
안녕하세요. 오늘은 스프링부트와 레디스를 연동해보도록 하겠습니다. 레디스는 주로 세션클러스터링을 위한 목적으로 사용이 되며 레디스와 세션 클러스터링에 대한 개념은 아래의 포스팅을
developer111.tistory.com
스프링 프로젝트 소스는 깃허브를 통해 내려받을 수 있습니다.
https://github.com/yojic-jung/springRedisProject
실습을 따라해보실 분들은 가급적 소스를 내려받아서 따라해보시기 바랍니다.
로그인 인증 권한 관련 시큐리티 설정이 되어있고 db 설정도 되어있으므로 소스를 내려받고
README.md 읽어보시고 db 설정도 맞춰서 따라하시기 바랍니다.
자바파일 두개, jsp파일 두개, mvc설정파일, db설정파일, 시큐리티파일 각 1개씩으로
최소한으로만 설정해 두엇으니 소스내려받아서 분석하여도 쉽게 파악할 수 있을 것입니다.
필요한 톰캣 library 파일
- tomcat-redis-session-manager-2.0.0.jar
- jedis-2.5.2.jar
- commons-pool2-2.2.jar
해당 파일을 maven repository 또는 구글링을 통하여 다운 받은 후 톰캣 폴더의 lib 폴더 밑에 두시기 바랍니다.
※ 혹여나, 톰캣 라이브러리에 jar 파일 추가했지만 이클립스에서 참조가 안되는 경우
[프로젝트 우클릭] -> properties -> Java Build Path -> Libraries탭 -> Add Library 버튼 클릭
-> Server Runtime 클릭 -> 톰캣 선택
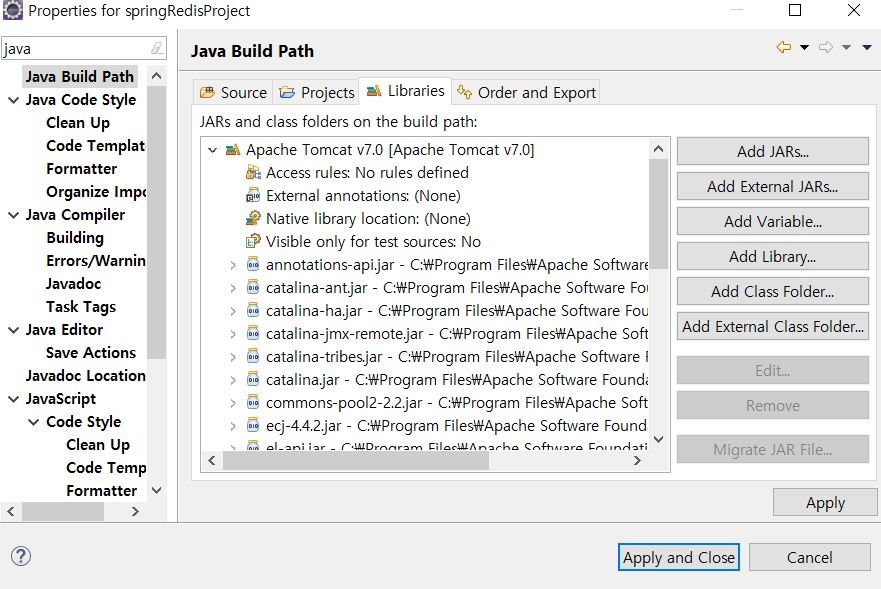
위 처럼 libraries탭에 Apache Tomcat이 있어야 하고 이전에 둔 jar 파일들이 보여야합니다.
스프링 프레임워크 설정
pom.xml
		<dependency>
			<groupId>com.fasterxml.jackson.core</groupId>
			<artifactId>jackson-core</artifactId>
			<version>2.8.3</version>
		</dependency>
		<dependency>
			<groupId>com.fasterxml.jackson.core</groupId>
			<artifactId>jackson-databind</artifactId>
			<version>2.8.3</version>
		</dependency>
		<dependency>
			<groupId>org.codehaus.jackson</groupId>
			<artifactId>jackson-core-asl</artifactId>
			<version>1.9.13</version>
		</dependency>
		<dependency>
			<groupId>org.codehaus.jackson</groupId>
			<artifactId>jackson-mapper-asl</artifactId>
			<version>1.9.13</version>
		</dependency>

		<dependency>
			<groupId>org.springframework.data</groupId>
			<artifactId>spring-data-redis</artifactId>
			<version>1.8.23.RELEASE</version>
		</dependency>

		<dependency>
			<groupId>redis.clients</groupId>
			<artifactId>jedis</artifactId>
			<version>2.10.2</version>
		</dependency>
springRedisCofig.xml
<beans xmlns="http://www.springframework.org/schema/beans"
    xmlns:mvc="http://www.springframework.org/schema/mvc"
	xmlns:context="http://www.springframework.org/schema/context"
	xmlns:xsi="http://www.w3.org/2001/XMLSchema-instance"
	xmlns:c="http://www.springframework.org/schema/c"
	xmlns:cache="http://www.springframework.org/schema/cache"
	xsi:schemaLocation="
        http://www.springframework.org/schema/beans
        http://www.springframework.org/schema/beans/spring-beans.xsd
        http://www.springframework.org/schema/mvc
        http://www.springframework.org/schema/mvc/spring-mvc.xsd
        http://www.springframework.org/schema/context
        http://www.springframework.org/schema/context/spring-context.xsd
        http://www.springframework.org/schema/cache
        http://www.springframework.org/schema/cache/spring-cache.xsd">

	<bean id="viewResolver"
		class="org.springframework.web.servlet.view.InternalResourceViewResolver">
		<property name="prefix" value="/WEB-INF/view/" />
		<property name="suffix" value=".jsp" />
	</bean>

 	<mvc:annotation-driven>
	   <mvc:message-converters>
	       <bean class="org.springframework.http.converter.json.MappingJackson2HttpMessageConverter" />
	   </mvc:message-converters>
	</mvc:annotation-driven>

	<context:component-scan base-package="com.yojic" />


	<!-- declare Redis Cache Manager -->
	<bean id="cacheManager" class="org.springframework.data.redis.cache.RedisCacheManager"
	      c:redis-operations-ref='redisTemplate'>
        <property name="expires">
            <map>
                <entry key="sessionData" value="7200"></entry>
                <entry key="portalData" value="7200"></entry>
                <entry key="referenceData" value="86400"></entry>
            </map>
        </property>
    </bean>

</beans>
위의 cacheManger 빈과 xmlns:c 태그와 xsi 태그 설정 참조하여 사용하시면 됩니다.
applicationContext.xml
<?xml version="1.0" encoding="UTF-8"?>
<beans xmlns="http://www.springframework.org/schema/beans"
xmlns:tx="http://www.springframework.org/schema/tx" xmlns:xsi="http://www.w3.org/2001/XMLSchema-instance"
xmlns:context="http://www.springframework.org/schema/context"
xmlns:p="http://www.springframework.org/schema/p"
xsi:schemaLocation="http://www.springframework.org/schema/beans
http://www.springframework.org/schema/beans/spring-beans.xsd
http://www.springframework.org/schema/context
http://www.springframework.org/schema/context/spring-context.xsd
http://www.springframework.org/schema/tx
http://www.springframework.org/schema/tx/spring-tx.xsd">
<tx:annotation-driven transaction-manager="transactionManager" />
<bean id="dataSource" class="com.mchange.v2.c3p0.ComboPooledDataSource"
destroy-method="close">
<property name="driverClass" value="com.mysql.jdbc.Driver" />
<property name="jdbcUrl"
value="jdbc:mysql://localhost/springdb?characterEncoding=utf8&allowMultiQueries=true" />
<property name="user" value="testuser" />
<property name="password" value="1111" />
<property name="idleConnectionTestPeriod" value="60" />
<property name="preferredTestQuery" value="SELECT 1" />
<property name="testConnectionOnCheckin" value="true" />
<property name="testConnectionOnCheckout" value="false" />
</bean>
<bean id="transactionManager"
class="org.springframework.jdbc.datasource.DataSourceTransactionManager" >
<property name="dataSource" ref="dataSource" />
</bean>
<bean id="jedisConnectionFactory"
class="org.springframework.data.redis.connection.jedis.JedisConnectionFactory" p:usePool="true" p:hostName="localhost" p:port="6379" p:password="abcd1234"/>
<bean id="redisTemplate" class="org.springframework.data.redis.core.RedisTemplate" p:connectionFactory-ref="jedisConnectionFactory" />
</beans>
xmlns:p태그와 jedisConnectionFactory, redisTemplate 빈설정 사용하시면 됩니다.
톰캣(was) 설정
이클립스 안의 톰캣서버 context.xml의 <Context> 태그 안에 다음 내용을 넣어주세요.
<Valve className="com.bluejeans.tomcat.redissessions.RedisSessionHandlerValve"/>

<Manager className="com.bluejeans.tomcat.redissessions.RedisSessionManager" database="0" host="127.0.0.1" maxInactiveInterval="30" password="abcd1234" port="6379"/>
참고로 레디스 비밀번호는 abcd1234 로 설정되어있습니다.
redis 비밀번호 설정 및 사용법 익숙하지 않으신 분들은 위의 링크된 스프링부트 레디스 연동 포스팅을 참조해주세요.
※주의.
위의 코드에서 RedisSessionHandlerValve 및 RedisSessionManager 클래스의 경로가
tomcat-redis-session-manager-2.0.0.jar 파일 버전 마다 다르기 때문에 jar 파일에서 경로 확인하여
수정이 필요하신 분들은 수정하기 바랍니다.
저도 이 부분 때문에 30분정도 삽질 했습니다.
프로젝트를 시작하고 레디스를 시작하여 테스트 해보겠습니다.

제 프로젝트의 로그인 페이지에 접속을 했고 이때, 레디스 서버에서 키값과 value값을 조회해보니
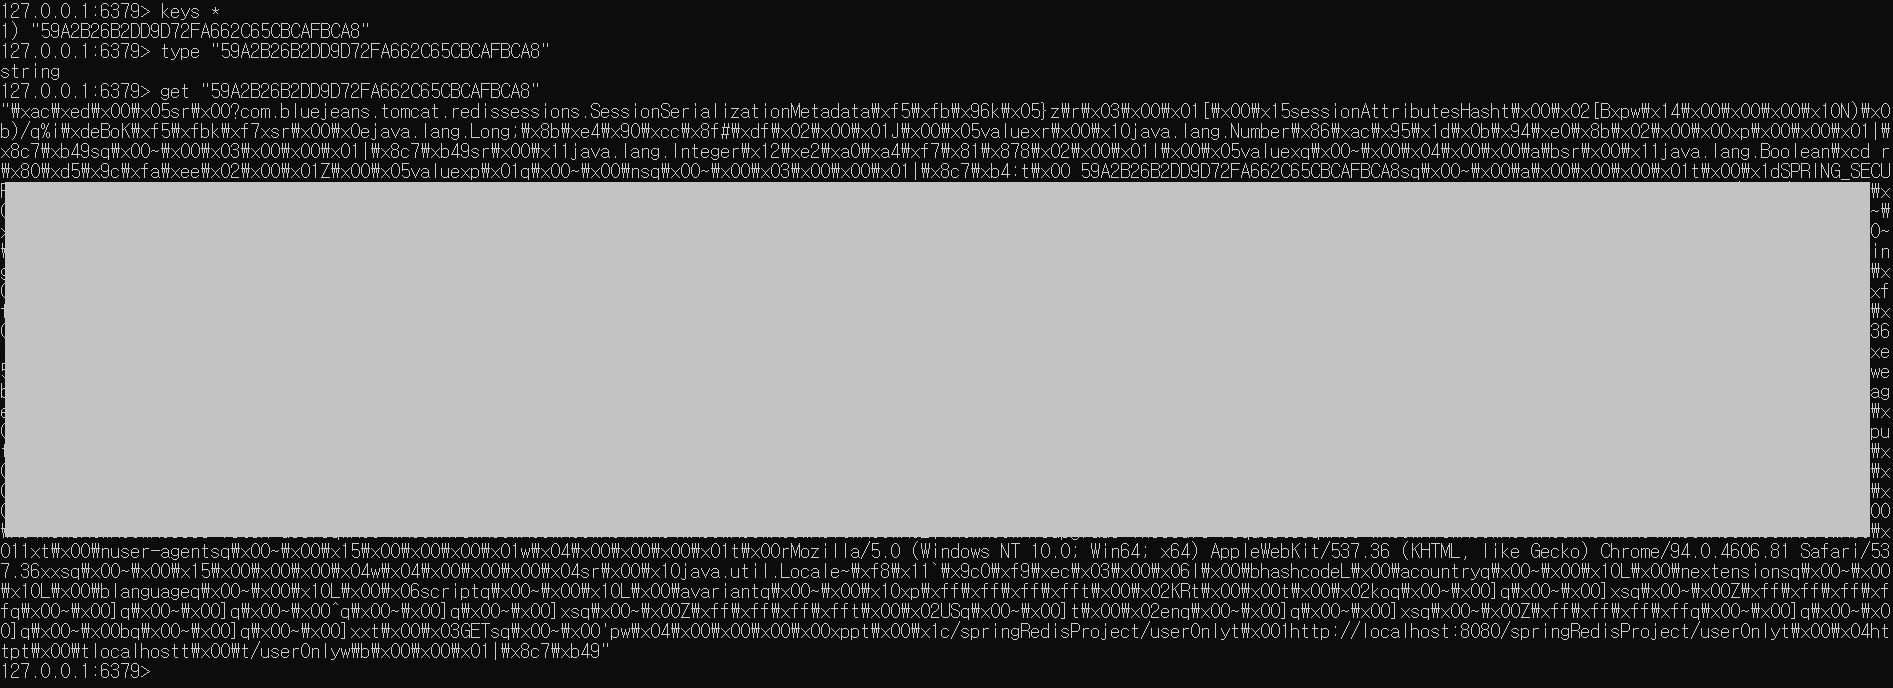
이렇게 무언가 나와있기는 했습니다.
일단 메모장에 붙여넣어주세요.
그리고나서 미리 DB에 설정해 놓은 email과 비번인 test@naver.com과 1111으로 로그인을 해보았습니다.

위 페이지는 스프링 시큐리티를 통해 로그인한 유저만 접근 가능하도록 설정한 페이지입니다.
다시 레디스 키값을 조회해보았습니다.
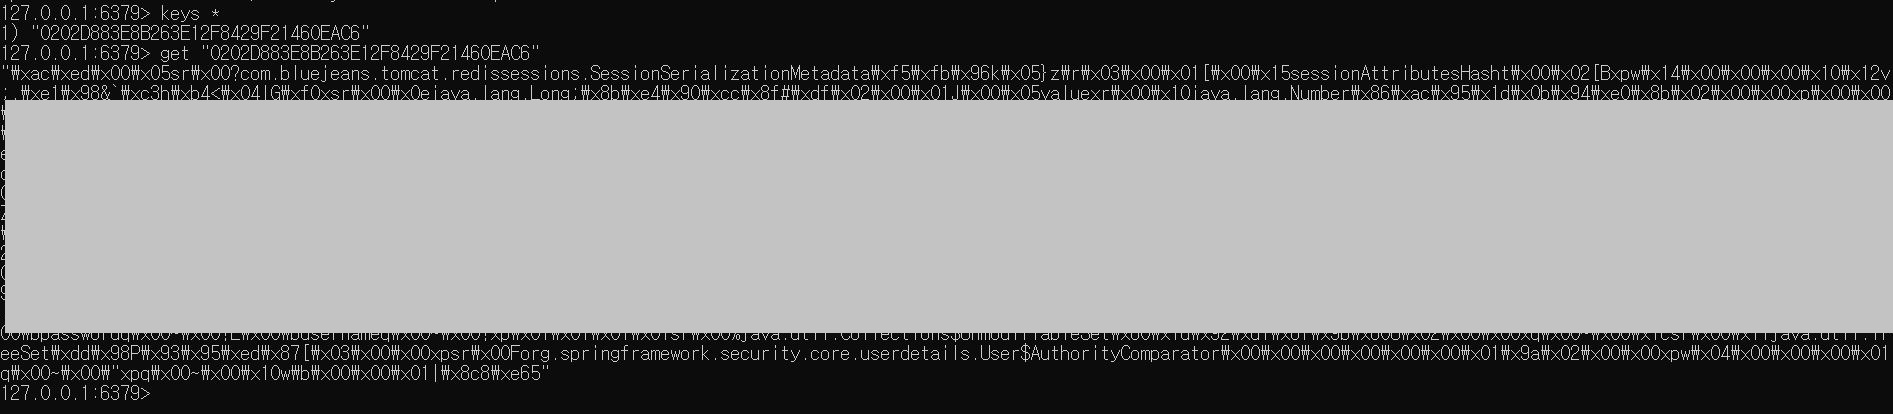
get을 통해 조회된 값을 메모장에 붙여넣어 test@naver.com이 있는지 찾기를 해보니 조회가 되었습니다.
로그인 하기전에 조회한 값에 대해서도 test@naver.com값이 있는지 찾기 해보세요.
로그인전에 조회한 값에 대해서는 존재하지 않을 것입니다.
이렇게 로그인 이후 세션정보가 레디스 서버로 전송됨을 확인 할 수 있습니다.
was의 세션정보가 레디스 서버에 전송됨은 확인이 되었는데
실제 세션 관리까지 레디스 서버에서 잘 이루어지고 있는 것인지 확인해보겠습니다.
레디스에서 db를 초기화 시키는 flushall 이라는 명령어를 실행시키고

userOnly 페이지에서 F5를 눌러보세요.
네 로그인이 풀리고 다시 로그인 페이지로 이동이 되었을 것입니다.
레디스서버에서 세션이 관리되는데 세션 정보가 모두 삭제되어서 로그인 인증이 풀린것입니다.
이를 통해 우리는 was의 세션 정보가 레디스 서버로 잘 전송이 되고 관리까지 잘 됨을 확인하였습니다.
실서버에서 세션 클러스터링 작업 환경을 구축하고 싶은 분들은 아래 포스팅 3편을 참조하여
실서버 환경을 구축해보시기 바랍니다.
https://developer111.tistory.com/74
스프링프레임워크&부트 aws redis 연동(로컬에서 실서버까지)[3]
안녕하세요. 스프링프레임워크&부트 aws redis 연동(로컬에서 실서버까지) 3편입니다. 이전 포스팅에서 로컬환경에서 세션정보를 레디스 로컬 서버에 옮겨 관리 하게끔 했다면 이번 포스팅에서
developer111.tistory.com
'AWS' 카테고리의 다른 글
| 스프링프레임워크&부트 aws redis 연동(로컬에서 실서버까지)[3] (0) | 2021.10.17 |
|---|---|
| 스프링프레임워크&부트 redis 연동(로컬에서 실서버까지)[1] (0) | 2021.10.15 |
| 스프링부트 aws ec2 리눅스 서버에 배포하기 (0) | 2021.05.23 |
| 아마존 RDS의 개념과 RDS와 EC2 연동하기 (4) | 2021.04.03 |
| [AWS]EC2 인스턴스 재부팅시 자바 + 톰캣의 메모리 초기화 이유 (0) | 2021.02.01 |